If DIY is your thing, then this reefing insight is for you! Lowering the cost to maintain our systems can be beneficial to everyone today’s economy. Here are some of my top money saving DIY hacks for reef keeping.
One important note before we start: any time you DIY chemicals for a reef tank, you’re taking responsibility for accuracy. Use RODI, label everything, keep it away from kids/pets, and start low + go slow. If a step includes a warning, it’s there for a reason.
Ditch Filter Socks (Save Money + Reduce Hassle)
Filter socks work, but they’re an expensive recurring cost. When you are using filter socks correctly, they are required to be changed weekly. This means either buying lots of them or cleaning and reusing the ones you have.
If you are reusing them, throwing them in the washing machine is the most prevalent method for cleaning. People do it all the time. I’ve done it myself in the past. But let’s address a major issue with this. Washing machines hold residues from detergent, fragrances, fabric softeners, and whatever else has been through that drum. These residues are most certainly things we want to keep far away from our tanks.
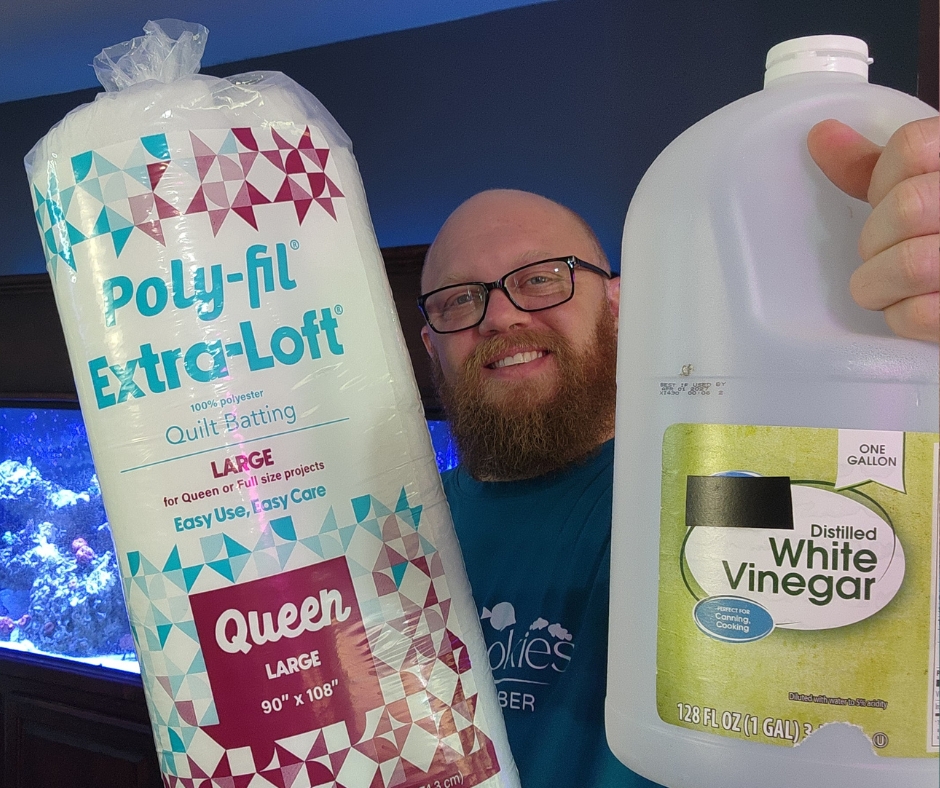
So, what is a more cost-effective alternative? A filter media basket + polyfill. It is extremely important to only use 100% polyester quilt batting / bound polyfill (not free-floating fibers) when incorporating this method. Using an unbound “pillow stuffing” style polyfill can result in those fibers finding their way into pumps and other places you do not want them to be.
Polyfill is one of those old school, effective reef hacks that has been used in the hobby for decades. When you use the correct material, it a clean, effective, budget friendly option.
Step-by-step: Polyfill in a media basket
- Get a filter media basket that fits your sock holder (bought or 3D printed).
- Buy 100% polyester quilt batting with no additives (no anti-allergen treatments, no fragrances, no “extra features”).
- Cut a piece to fit the basket so water is forced through it evenly.
- Install the basket where your sock would go.
- Replace the polyfill as it clogs (often every few days to weekly depending on how dirty the tank is).
- Keep an eye on overflow behavior: if it backs up fast, change the polyfill sooner.
DIY “Coral Snow” for Clearer Water
This is one of the easiest DIY wins.
“Coral snow” is essentially a very fine calcium carbonate (CaCO3) slurry suspended in liquid used to help improve water clarity and bind unwanted substances. These particles bind to dissolved organics and fine floating debris creating larger particles that your filtration can remove more easily. It tends to work best if you have a skimmer you can tune, because you will need to skim a bit wetter for a short period of time. You can think of ‘Coral snow” in terms of water polishing and export assistance. It can help stabilize situations where the water column is loaded with dissolved organics, but does not correct the root cause of any imbalance.
To create DIY “coral snow” you will need the following things:
- Food-grade calcium carbonate
- RODI water
- A clean bottle with a cap
- Measuring spoons
Step-by-step: DIY coral snow mix
- Add 500 mL of RODI water to a bottle.
- Add 10 level teaspoons of food-grade calcium carbonate.
- Cap it and shake hard.
- Label the bottle (contents + date).
How to dose
- Dose 5 mL per 50 gallons of system water volume.
- Pour into a high-flow area and let it do its thing.
- If you run a skimmer, you can skim wetter for a day or two, then return to normal.
DIY Nitrate Dosing
If you need to raise nitrates in your reef tank, you can DIY a dosing solution using food-grade sodium nitrate or potassium nitrate. Both work, but you must test regularly, especially with potassium nitrate, because overuse can elevate sodium or potassium levels and throw off your balance.
A 1-lb (454 g) bag can last over a year. For example, if your tank requires 16 mL per day, a single $17 bag makes enough solution to stretch for many months at roughly $2 per liter (including RODI or distilled water). It’s inexpensive, precise, and far more controllable than overfeeding to raise nitrates, which often drives phosphates too high and creates another problem to fix.
What you need
- Food-grade sodium nitrate or potassium nitrate
- RODI (or distilled) water
- A scale (grams matter here)
- A 1-liter container/bottle
Safety note:
If you use potassium nitrate, watch potassium long-term. Overuse can push potassium higher than you want. Sodium nitrate is typically the simpler route for most people, but may slightly elevate salinity, so test often.
Step-by-step: Nitrate solution recipe
- Measure 44 grams of sodium nitrate (or potassium nitrate).
- Add to 1,000 mL (1 liter) of RODI water.
- Cap and shake like you mean it until fully dissolved.
- Label clearly: “Nitrate solution – Do not drink” + date.
Dosing math (easy, I promise)
mL to dose = (desired nitrate increase in ppm ÷ 5) × total system gallons
Example:
- System volume: 40 gallons
- Desired increase: 2 ppm
- (2 ÷ 5) × 40 = 16 mL
Dose in a high-flow area, then re-test later. Don’t slam a tank with big jumps—small steps are cleaner and safer. Stick to 0.5ppm increase per day.
DIY Phosphate Dosing (Powerful Stuff — Respect It)
Just like DIY nitrate dosing, you can also make a DIY phosphate solution.
I use Loudwolf sodium phosphate dibasic. You’ll mix it with RODI water to create a precise, controllable solution for raising phosphate in your reef tank.
This is especially helpful in new tanks with dry rock, which often absorb phosphate (and nitrate) and can keep levels stuck at zero. A DIY solution, or a commercial product if you prefer, allows you to bring levels up in a controlled way.
What you need
- Sodium phosphate dibasic (make sure you have the correct form)
- RODI water
- A gram scale (non-negotiable here)
- A 1-liter container
Step-by-step: Phosphate solution recipe
- Measure 3 grams of sodium phosphate dibasic.
- Mix into 1 liter of RODI water.
- Shake until fully dissolved.
- Label it loudly.
Strength / dosing warning
- 1 mL of this solution can raise 100 liters of saltwater by 0.02 ppm phosphate.
That means it’s easy to overshoot if you get sloppy.
Critical incompatibility warning
Do NOT use this alongside kalkwasser / limewater dosing. You can trigger calcium phosphate precipitation, and that’s a bad day.
For phosphate dosing math, use a reputable aquarium dosing calculator and double-check your inputs before you add anything.
DIY Carbon Dosing
Next on the list is DIY carbon dosing. I used to mix distilled white vinegar and 80-proof plain vodka and called it “Popox” for budget reefers, but you don’t have to mix them. You can use either one. I prefer distilled white vinegar because a gallon costs about $3.
The purpose of carbon dosing is simple: you add a carbon source to grow beneficial bacteria. Those bacteria consume nitrates and phosphates, and then your skimmer and filtration remove the bacteria from the system thus lowering nutrients safely and effectively.
This method is extremely effective and can literally be done with grocery-store vinegar.
Let’s look at the numbers. One gallon contains 3,785 mL. On a 300-gallon total system volume, I would use at most about 225 mL per week. That means one $3 gallon lasts roughly two months. You won’t beat that price with commercial products.
As with any dosing method, start low, go slow, and track your parameters carefully. I’ve linked a dosing chart that includes both vinegar and vodka so you can determine proper starting amounts based on your tank size and adjust from there.
Your budget options
- Distilled white vinegar (my favorite budget route)
- Plain 80-proof vodka (also works)
You can use one or the other; mixing is optional.
Step-by-step: DIY vinegar carbon dosing approach
- Use distilled white vinegar (plain, nothing fancy).
- Start very low. Carbon dosing isn’t a “dump it in” thing.
- Dose into a high-flow area.
- Watch nutrients over time and adjust slowly.
Why vinegar is such a cheat code
A gallon is 3,785 mL, costs a few bucks, and can last a long time even on large systems. The key is following a proven dosing chart for your tank size and ramping carefully.
Important: carbon dosing is safest when paired with a functioning skimmer and good oxygenation. Always monitor for signs of bacterial bloom (cloudy water) and back off if anything looks off.
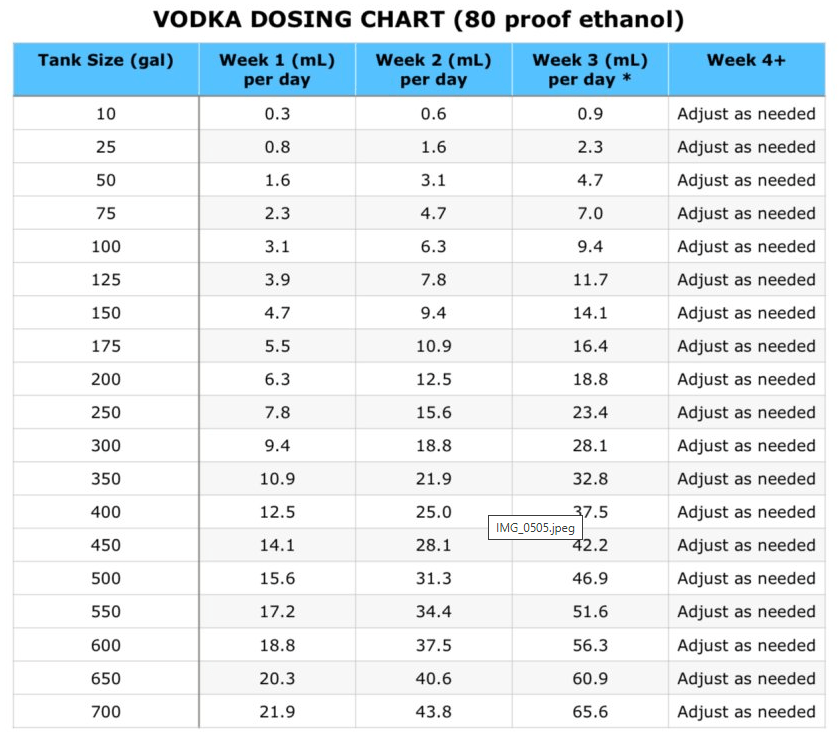
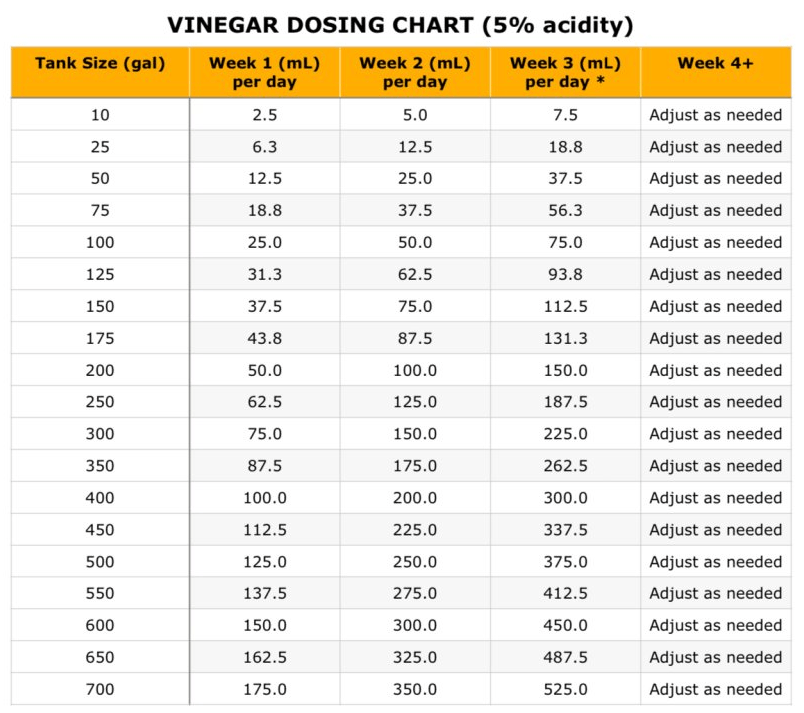
Image credit: Randy Holmes Farley – reef2reef.com
DIY Calcium Dosing Solution (Calcium Chloride)
You can DIY a calcium dosing solution using calcium chloride dihydrate + RODI water. This adds calcium only (it won’t directly raise other parameters), making it a great option for high-demand tanks or anyone who doesn’t have room for a calcium reactor. Put it in a dosing container and slow-dose it with a pump/drip to maintain calcium.
What you need
- Calcium chloride dihydrate
- RODI water
- A gallon jug
- A scale
Step-by-step: Calcium solution recipe
- Start with ½ to ¾ gallon of RODI in a container (don’t fill to the top yet).
- Add 500 grams of calcium chloride dihydrate.
- Mix until fully dissolved. Preferably with an automatic mixer.
- Top off with RODI to 1 full gallon.
- Mix again and label.
This yields roughly 37,000 ppm calcium in the gallon mix (strong). That means tiny doses can move numbers fast!
How to start dosing safely
- Big systems: start 1–2 mL, test, adjust.
- Small systems (like a ~20g): start 0.25–0.5 mL, test, adjust.
General guideline mentioned in the transcript:
- Calcium can typically be raised about 20–30 ppm per day safely, but stability still matters more than speed.
DIY Magnesium Solution (Balanced: Epsom + Magnesium Chloride)
Magnesium dosing is slightly more involved because it requires two ingredients, but it’s still simple.
To make an ionically balanced magnesium solution, use magnesium sulfate (Epsom salt) and magnesium chloride hexahydrate mixed with RODI water. You can use only Epsom salt since it’s easy to find, but doing so can raise sulfate levels too high over time and throw off the tank’s ionic balance. If you have a system with higher magnesium demand, it’s best to use both forms to keep things balanced.
What you need
- Magnesium sulfate (Epsom salt)
- Magnesium chloride hexahydrate
- RODI water
- A 1-gallon jug
- Measuring cups
Step-by-step: Balanced magnesium mix
- Add 3 cups magnesium sulfate to the jug.
- Add 5 cups magnesium chloride to the jug.
- Add RODI water up to 1 gallon.
- Mix thoroughly (this can take a while).
- Let it sit (you may get some precipitate on the bottom)
- When dosing, pull from the clear liquid above the precipitate and avoid sucking up the sludge.
This produces a strong mix (about 47,000 ppm magnesium).
Dosing approach
- Start 1–2 mL per day and track magnesium with a test kit.
- Magnesium can typically be raised about 100 ppm per day safely, but again: slow and steady wins.
DIY Alkalinity and pH Solutions (Read This Twice)
I saved this one for last because adjusting alkalinity and pH is where things can go wrong fast. If you make aggressive changes here, you can absolutely crash your tank. Calcium can usually be increased 20–30 ppm per day without much risk. Magnesium can often be raised 100 ppm per day safely. But alkalinity and pH are different. These need to be adjusted slowly and carefully.
This dosing method uses a simple, predictable way to correct alkalinity, and in some cases, pH as well. The benefit of this approach is control. You can make measured, calculated adjustments instead of guessing or relying on more complex equipment.
There are two ways this method functions, depending on the problem you’re trying to solve. If your pH is already in a good range, such as around 8.3, but your alkalinity is low, this approach allows you to raise alkalinity without significantly affecting pH. That makes it ideal for situations where you want to improve stability without shifting your pH upward.
If both alkalinity and pH are low, a modified version of this method can raise them together. This version is more aggressive and will push pH upward while increasing alkalinity. Because of that, it requires even more caution and careful monitoring.
No matter which approach you use, the key is slow, controlled dosing. Add the solution gradually in a high-flow area of the tank or sump to prevent localized spikes. Monitor both alkalinity and pH closely as you make adjustments. Avoid allowing pH to jump more than 0.2 at one time. If it does, stop dosing for the day and resume later. As for alkalinity, do not raise it more than 0.5 dKH per day at the absolute maximum. Slower is safer, and many experienced reefers prefer adjustments closer to 0.1 dKH per day.
This method is powerful because it gives you precision and flexibility. It can correct low alkalinity without disturbing pH, or it can raise both when needed. But it only works well when it’s approached with patience. Stability is the goal, and slow, calculated changes are what protect your reef.
Option A: Baking soda (sodium bicarbonate) for alkalinity with minimal pH change
Best when your pH is already solid and you just need to raise alk.
Step-by-step: Baking soda alkalinity solution
- Start with less than a full gallon of RODI in your container.
- Add 297 grams of baking soda.
- Mix fully (warm water helps).
- Top off to 1 gallon.
- Label it.
This raises alkalinity predictably without affecting pH much. It MAY slightly lower pH.
Option B: Soda ash for alkalinity + pH boost
Best when pH is low and you need both pH and alkalinity to come up.
Step-by-step: Make soda ash (baked baking soda)
- Measure 594 grams of baking soda.
- Spread it evenly on a cookie sheet.
- Bake 1 hour at 200°C.
- Let it cool completely.
- Store dry in an airtight container.
Step-by-step: Soda ash dosing solution
- Add all of the soda ash to less than a gallon of RODI.
- Mix well (warm water + mixer helps a lot).
- Top off to 1 gallon.
- Label it.
This is aggressive stuff.
How to dose alk/pH safely
- Dose into very high flow, ideally slow drip in a sump or right in front of strong flow.
- Do not increase alkalinity more than 0.5 dKH per day (absolute max).
- A safer pace is 0.1 dKH per day while dialing in.
- Don’t swing pH more than 0.2 in a single adjustment window. If it moves 0.2, stop and continue next day.
Example:
In a ~300 gallon system, 35 mL of a strong soda ash solution could move alkalinity about 1 dKH (and that’s why we don’t rush this).
Use a reliable alkalinity calculator, confirm your system volume, and double-check your units before you dose anything.
Final Thoughts (And a Big Honesty Moment)
DIY reefing isn’t about being cheap. It’s about being intentional.
When you understand what’s actually in the products, you can start making measured, controlled adjustments that serve your system. That’s a different level of reef keeping.
If you go the DIY route, you MUST remember that precision matters. Measurement matters. Patience matters. The money you save only counts if your tank stays stable. Slow adjustments, good test kits, labeled containers, and double-checked math are non-negotiable.
If you’re willing to be disciplined, DIY can give you control, confidence, and serious long-term savings. If you’re not, there’s no shame in sticking with commercial products. The goal isn’t to DIY everything. The goal is to build a thriving reef.

Leave a comment